Home / Topics / Food and nutrition
Food and nutrition · How-to
How to build and rotate an emergency food supply
Start with three days, build toward a month, and rotate everything.
Safety numbers are quoted, not invented. Every dose, time, temperature, and ratio on this page is copied from the agency named beside it. Where agencies differ, we show each one with its source instead of picking. If your local health department or officials give different instructions, follow them.
How much to store
- Ready.gov: at least a several-day supply of non-perishable food.[1]
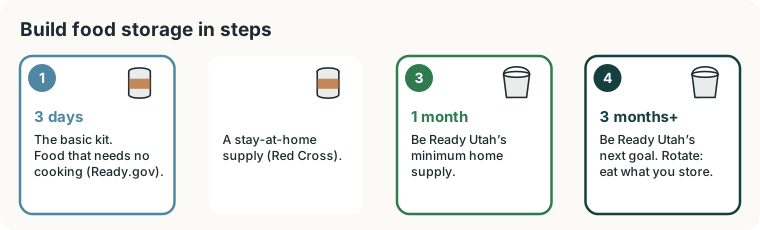
- Be Ready Utah: start with a three-day supply in your disaster kit, work toward a minimum one-month supply for each household member, then keep building toward three months or more as budget, ability, and space allow.[2] Build gradually across all food groups, and don’t go into debt doing it.[2]
Choose food you’ll actually eat
- Choose foods your family will eat, and remember special dietary needs.[1]
- “Eat what you store and store what you eat.” Rotating stored food through everyday meals prevents waste and keeps your digestion used to it.[2]
- Allergies don’t go away in a crisis. Be Ready Utah warns against basing your storage on a food someone can’t eat.[2]
- Older adults, infants, children, and nursing mothers may need milder, easier-to-digest foods. Stock plenty of pet food too.[2]
Ready.gov’s suggested foods
- Ready-to-eat canned meats, fruits, and vegetables, plus a can opener
- Protein or fruit bars
- Dry cereal or granola
- Peanut butter
- Dried fruit
- Canned juices
- Non-perishable pasteurized milk
- High-energy foods
- Food for infants
- Comfort/stress foods[1]
Include a manual can opener and eating utensils.[1]
Rotate: first in, first out
- Write the purchase date or “use by” date on every item with a marker.
- Put new items at the back of the shelf and pull from the front.
- Keep a simple inventory, and use and replace items as part of normal meals. Be Ready Utah notes most off-the-shelf foods have a shelf life of less than a year.[2]
- Check the shelf every few months for damaged cans and items close to their date. Eat those first.
Store it where it lasts
Be Ready Utah’s storage rules:[2]
- Cool. For every 18°F increase above the ideal range (40° to 70°F), you lose half of your food’s shelf life.
- Avoid temperature swings. Freezing and thawing can loosen seals or break containers.
- Indoors, and low. Avoid sheds and garages unless they’re well insulated. Heat rises, so keep shorter-shelf-life items like oils and dairy on lower shelves.
- Dark. Light degrades nutrients, especially vitamins A, D, E, and K.
- Dry, and off the floor. Keep containers off floors and walls so condensation doesn’t form. Pallets or shelving let air circulate.
Keep out oxygen, moisture, and pests
- Use food-grade buckets or #10 cans for bulk dry foods. Mylar (foil) bags add oxygen, moisture, and light protection, and need a heat sealer.[2]
- Oxygen absorbers: Be Ready Utah says one 300cc packet is enough for a one-gallon container.[2]
- Only store dry foods with 10% moisture or less, or there is a risk of botulism.[2]
- Don’t store food in garbage bags. They are often treated with pesticides.[2]
- Whole grains keep their nutrition far longer than ground flour.[2]
Throw out damaged cans
Don’t eat food from cans that are swollen, dented, or corroded, even if the food looks safe. Don’t eat anything that looks or smells abnormal, even if the can looks fine.[1] Be Ready Utah adds: bulging, leaking, bad smell, liquid that squirts when opened, cans that froze, milky liquid, or rust inside the can or on the seam.[2]
Next: no-cook meals and food safety in a power outage.
Sources
- FEMA / Ready.gov: Food
- Utah DEM / Be Ready Utah: Food (12 Areas)
Official pages checked 14 November 2026. Guidance changes; follow your local officials first. How we research.
Page checked on · Change log · Report an error · Calm by design